In an effort to stay connected with this great community, I will start posting more stuff. Sometimes it might be long, sometimes it might be a short “Photo Of The Day” like this one 😂
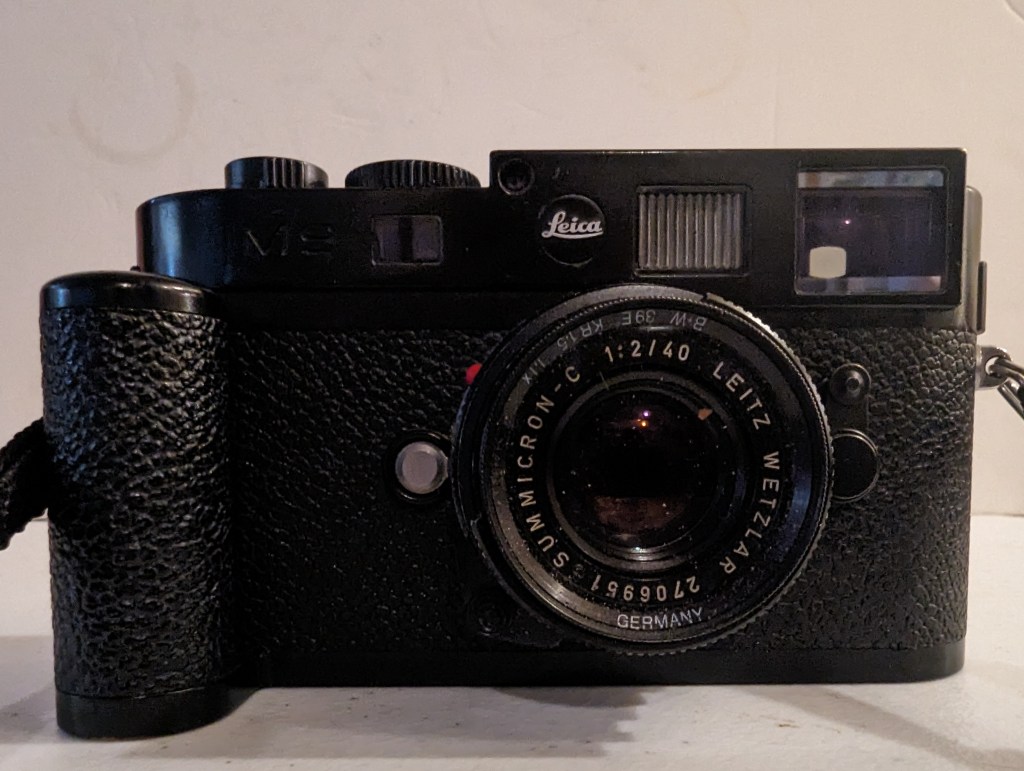
This image was taken with a Leica M6 & 50mm f/2 Summicron-M and CineStill BWXX film, developed in HC-110. I like the look of this film! I have to shoot it more to get a real feel for it, but so far I like it a lot. Have a great weekend you guys and happy shooting! 😍❤️👍
Hello and good morning you awesome war torn camera geeks! It’s been a helluva while hasn’t it? Well, I had a little time so I figured I’d write to keep you guys posted on recent events and what we’re currently doing. I’m going to delve into several topics so forgive me if it sounds like I’m rambling. I will divide the topics into titles for easier digestion 😂
“Coffee Art” 😂 2024. We’re still here! 👍
The Passage Of Time
Last year I took a trip overseas to the Philippines and Thailand. It still feels like I just came back to the States yesterday. But it’s already been ten months! What the?!
Cafe. Tha Sala, Thailand 2023.Beach. Wildwoods, NJ. 2015Camera fun with baby girl and the Panasonic Lumix DMC-LC1 ❤️ 2009.“I Love L.A.” 😂 Los Angeles, California, 1988. Minolta X-700 & 50mm f/1.7 MD lens. Photo taken by my brother I think!“Sam Fam” ❤️ 2024. Google Pixel 7 Pro
I don’t want to just talk about myself so if you’re of a certain age, please let me know if you can relate to this…
It seemed not too long ago I was a teenager. Then I became a young man trying to find my way in my twenties. Then I got settled down in my thirties. Then the forties came and went. Now into my fifties, I still feel I haven’t accomplished much of anything. And I wonder how much time do I have left.
Listen, I hate to say this, but at the rate these years have been flying by, we’ll be done before we know it! Fifty years sounds like a long time but when you realize how fast one year goes by, is fifty, eighty, or a hundred even that long in reality?
People say grow old gracefully. I’m trying to do that but I don’t know how to. I mean, I still feel like 35 and sometimes even younger but I know I’m not.
People say the fifties are still young. Maybe in today’s world it is but as a younger man, I remember thinking 50, 60, 70, etc, that’s old! Now I’m in that first spot.
I know I sound like a Debbie Downer but on the positive side, I feel as if I can do almost anything I did at thirty but better ❤️ I’m more sure, I’m not as awkward.
But one profound difference I can see is the people who are younger than me, people in their 20s, 30s, and 40s see me as someone older or maybe even “old” in their eyes.
And it doesn’t help that physically more fine lines have appeared on my face. The skin sags a little more. The hairline is receding. This is aging.
My Mom once said you’ve got two choices. Either you grow old or you’re dead. Wise words! Yet somehow it doesn’t make me any more comfortable with the thought of aging.
To me as one ages, not only are changes in physical appearance inevitable but there’s also a very real, increased chances of some dreaded illness or disease coming your way. In the past four years, we have lost four beloved family members. That’s one a year!
Of course I try to eat healthy, try to get more rest, try not to stress too much. I need to exercise more. But honestly, there’s only so much one can do. When it’s your time it’s your time. But yes, I want to be around to see what my kids do with their lives, to help them whenever I can.
To me aging is like falling into a whirlpool that keeps pulling you towards that center and you can’t escape it.
How do you guys deal with it? I’d love to hear your thoughts! Perhaps it would help me deal with aging better. Thanks in advance 🙏🙏
One thing that’s been with me through all the decades is my love for cameras, lenses, and photography. That is the one singular constant I can think of 😍👍
THE YOUTUBE DILEMMA
As I mentioned to you guys a few years ago, I was writing less here in order to focus on building my YouTube channel. That was in 2018.
I can tell you right now, unless you can commit to doing it consistently, I wouldn’t recommend it.
I’m still not monetized but I’m close to meeting their requirements. I’d probably have gotten there sooner if I were posting more consistently but as a family man who has two growing kids and a day job, I just can’t. Instead, I just post whenever I can put something together. That’s not the formula for YouTube success.
A recent and seemingly popular video about the cameras of Daido Moriyama.
So here’s what I’ve learned from my six years on YouTube. First you need a topic or subject. In this case, I have many! The channel is about cameras, lenses, and photography. I got this covered!
A recent and not so popular video about my very first digital camera and the early days of film vs digital. As a smaller channel, I noticed that some videos get a lot of views and some get very little views. The most interesting part is that some videos “catch on” but much later! Some people say the dreaded “YouTube Algorithm” is responsible for what people see and what they don’t.
Second, you need good video quality. High quality video production counts on YouTube. I have the equipment to make better videos but I’m not a videographer and I’m lazy so I just use my phone most of the time. Count that as a strike against me 😪
Third you need to spend hours editing. This is the part I hate most! As a photography and camera review channel, I have to gather the necessary photos from the cameras/lenses being reviewed. Then I have to put them together and often narrate. Then I try to find some ear pleasing music to keep it flowing. After that, I have to edit all the parts together and make it into one cohesive video.
And the worst part? Sometimes I get decent views but often times I get very little views and since YouTube is not paying me yet, I feel very little motivation to continue but I push forward. I feel I’ve just scratched the surface of all the things I’d like to share with the good camera loving folks out there 😍
Anyway, YouTube and other social media like Instagram and Facebook are what has kept me from this blog for so long. Even though I’m an old school guy, I kinda feel that writing is passe 😂 I know I’m wrong, convince me that I’m wrong!
But yeah, until I can actually see the benefits I can’t really recommend doing YouTube.
RECENT PROJECTS
I’m pretty much doing the same thing I’ve been doing for years, that is I’m shooting with film and digital gear ❤️
I’ve been focusing a lot of my YouTube videos on digicams because that’s been a favorite of viewers of my channel and it so happens that I’ve been collecting old vintage digital cameras for a long time so it works out.
The Leica Digilux 2 of 2003.
There’s a lot of film stuff I want to cover, but I feel that the channel doesn’t have enough traction yet to make these videos worth the effort.
Here’s a recent project I’m working on. It’s the original Rolleiflex from 1929. When I got it, the camera had only one working shutter speed which is 1/500, the rest were sticking. I fixed it up to where only the slowest speeds stick and I’m able to use the camera in the range I need. But today’s posting is not about the Rolleiflex, as fascinating as it is. I’ll keep you guys posted on my progress with this legendary camera
And here’s some recent film images…
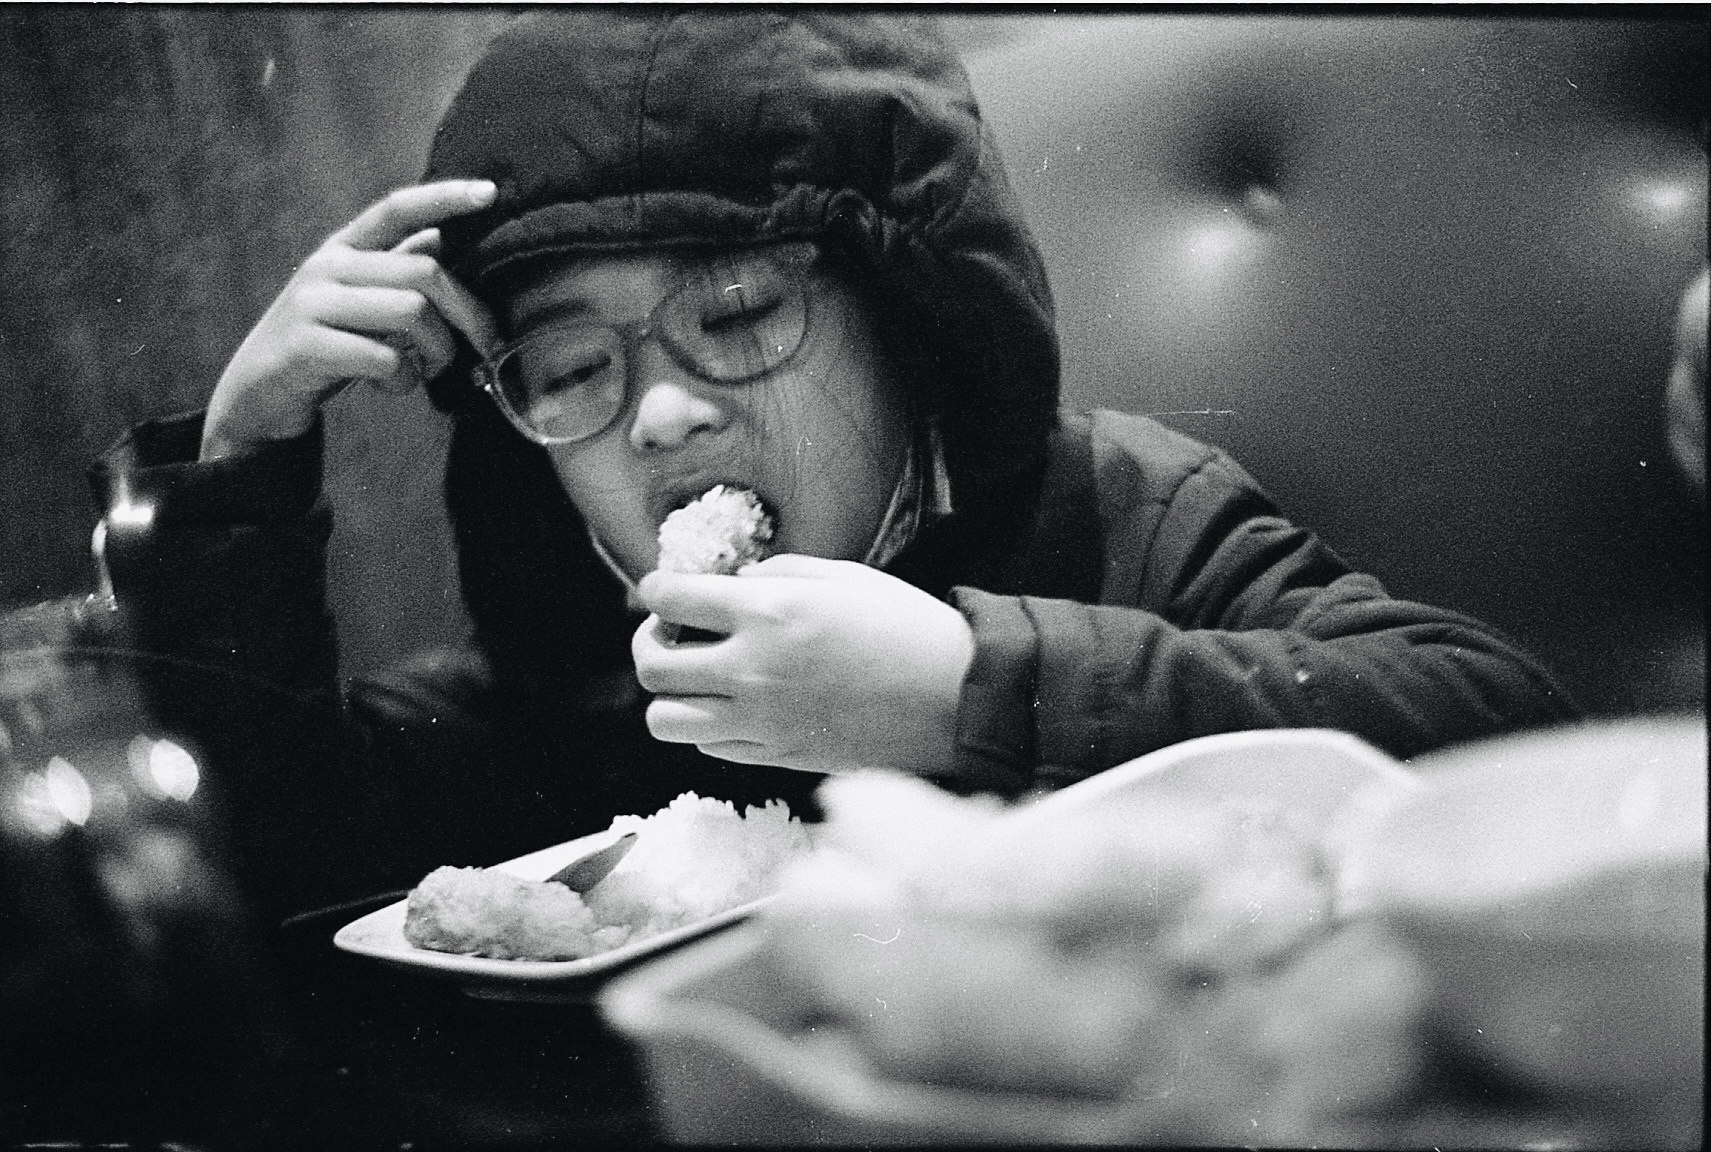
Pool Party 2023 ❤️ Leica M6 & 50mm f/2 Summicron on CineStill BWXX ISO 250 developed in HC-110Manila Traffic 2023. Leica M6 & 50mm f/2 Summicron-M on CineStill BWXX Oldest Lady In The Village. Sa Kaeo Village, Nakhon Si Thammarat, Thailand. Leica M6 and 50mm f/2 Summicron-M on CineStill BWXX ISO 250. Image was very underexposed but I was able to recover the gist of it and I don’t mind the grit!My most recent project photo ❤️ Test shot with a Graflex RB Series B 4×5, Kodak No. 33 f/4.5 Anastigmat and Arista EDU 400 film developed in HC-110.The nearly one hundred year old Graflex RB Series B is a “portable” 4×5 camera that can be had around $300. I think this will be a great portrait camera! 😍
Thank you guys so much for reading this today! If you made it this far I just wanted to thank you ❤️🙏❤️ The reason this post is so long is because we’ve got some catching up to do and I’m making up for lost time! Appreciate you guys, thank you!
Good morning you awesome camera geeks! An old song once said “Hello stranger, it seems like a mighty long time!” Well today it’s more like Neil Diamond with “Hello Again” Hello 😂
I would like to thank my friend Frank B. from upstate NY for this post because he reminded me that I haven’t posted anything on the blog since last October! Wow, has it been that long?
On a recent flight to the Philippines.
I spent the last month traveling in the Philippines and Thailand. On this trip I decided to bring less gear but really focus on a few key Camera Legend cameras, some of which you’ll see in this post.
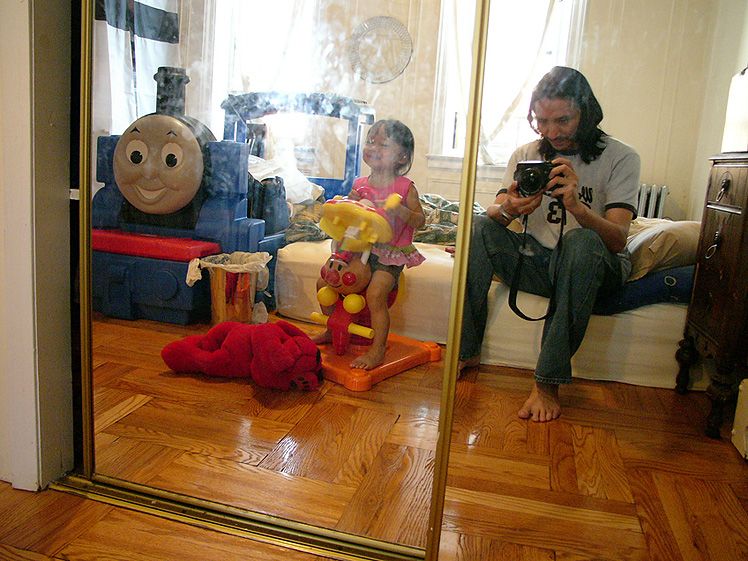
Multi-Tasking in Bangkok with the Minolta TC-1. I don’t multitask well but somehow I did it for this shot 😅
The trip may explain my inactivity for last month but what about the rest of the year you might ask? 😂
Well first of all let me apologize to all the great bloggers who I follow, who I haven’t dropped by to leave a comment or two. I have come to realize that I simply cannot multitask! And it gets worse the older I get.
It originally started out with me wanting to concentrate on my YouTube channel. Then my phone filled up and it automatically offloaded some key apps like WordPress and since I wasn’t posting much anyway, I very nearly forgot about it! I suck I know! 😂
Anyway with my regular day job, with Instagram and Facebook and YouTube I simply got burnt out. I apologize and I have the deepest respect for you guys who do this on a daily basis 🙏🙏
I got to a thousand subscribers on YouTube but I’m still not making any money off it. They keep upping the ante like you need a certain amount of watch time, certain amount of subs, etc. Honestly I hate making videos and I don’t really recommend it unless you’re a video-centric person.
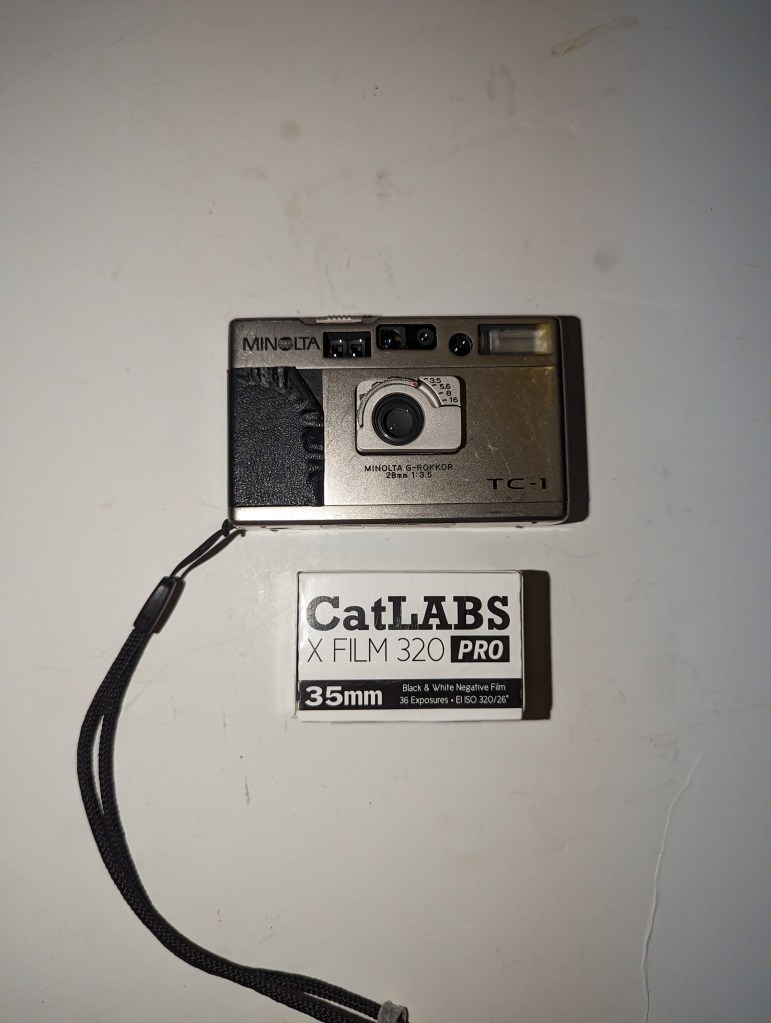
But among the legendary cameras I took on this trip, my two most used were the Minolta TC-1 and the Leica M9.
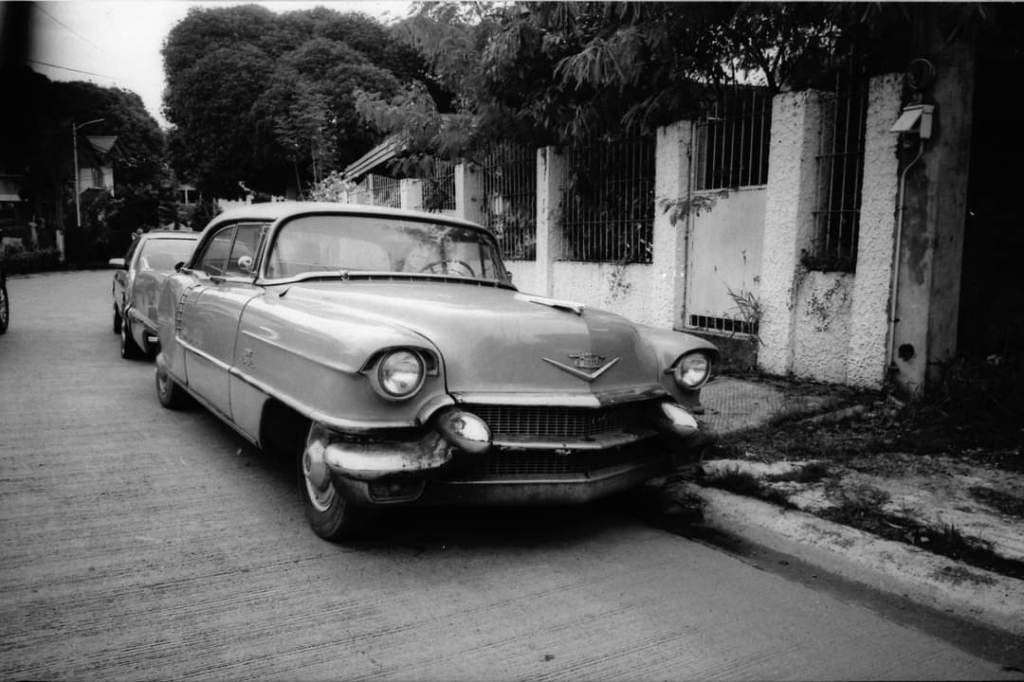
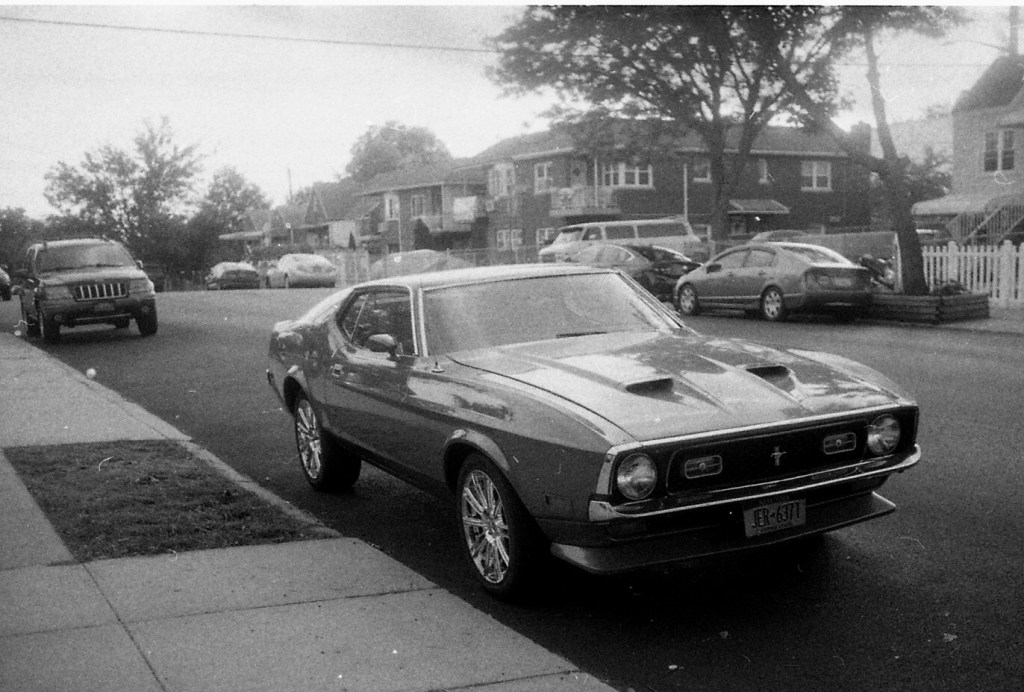
The Minolta TC-1 and CatLabs X Film 320.Classic car spotted in Manila, Philippines. Anyone know what make/model this is? Shot with the Minolta TC-1 and CatLabs X Film 320 developed in HC-110 developer
I found myself using the TC-1 a lot on this trip. Its tiny diminutive size was a plus! I’ve written about the TC-1 here before but have yet to do a full review either here or on YouTube. I hope to once I get all my film developed.
The Leica M9 is a legendary digital Leica introduced in 2009. I actually picked up mine in 2020. I got a great deal on the camera and I used the extra money I made during the COVID-19 pandemic to pay for it.
As a user of the older M8 since 2010, I felt right at home with the M9. Even though the M8 is APS-H (1.3x Crop Factor) and the M9 is full frame, they produce (mostly) similar looking files.
“Chillin'” 2023. Leica M9 and 40mm f/2 Summicron-C.“Pa Jian” A 91 year old lady in Nakhon Si Thammarat, Thailand. She reveals her secret to long life in my latest video. Shot with a Leica M9 and 40mm f/2 Summicron-C.Kodakchrome like colors are one of the hallmarks of the Leica M9.Does anyone besides me miss those cute COVID masks? 😍 Shot in the fall of 2020 with the Leica M9 and 35mm f/1.2 Voigtlander Nokton Halloween 2022. Is it almost time for Halloween again? Time moves fast my friends and I’m making up for lost time! Leica M9 and Voigtlander 35mm f/1.2 Nokton.The Leica M9 is a fantastic image maker even in 2023 but is it worth the risk? To me it is but only you can decide whether a camera from 2009 is still worth buying.
I’ve heard people describe the M9 as having an upscaled version of the M8 sensor and they indeed produce similar looking images for the most part. Although I’m not anywhere ready to write a full M9 review what I can say is imagine all the things you like about the M8 but make them better. That’s what the M9 is. Better color correction, better resolution, plus making full use of your lenses with the full frame sensor. But it has one major flaw. Sensor Corrosion!
Here’s my latest YouTube video which is part travel, part review. It’s not a complete M9 review but I think you’ll find out almost everything you need if you’re considering buying an M9.
I dedicate this video to the memory of Anthony Bourdain whose food and travel videos were an inspiration to me. In fact, although I don’t advocate smoking, I included the smoking scenes as a tribute to him, particularly the early Bourdain. I think that rawness was part of his charm.
I have been watching his shows since he was on the Travel Channel with “No Reservations.” Then he moved to CNN and did “Parts Unknown” for many years. Then seemingly at the height of his fame, he took his own life in 2018. A sad ending for a man who brought a lot of joy to many many people.
Anyway that’s it for today! I just wanted to say hi and try to get a post in. I appreciate anyone reading this. Thank you very much!
Good morning you awesome camera geeks! A couple of years ago I posted a video on YouTube called “Benefits Of A Cheap Camera.”
Now in that light hearted and cringe worthy video, which was filmed very badly on an old iPad, I went on to jokingly point out why using a cheap camera could be beneficial.
Before YouTube began hiding dislikes, I recalled that video get quite a fair number of dislikes although there were, fortunately, more likes than dislikes.
I chalked it up to people not “getting” my light hearted, comedic style of camera reviews. I truly think some of my best ad lib camera jokes are on that video! 😍😂
This video was one of the reasons why, for a long time, I viewed the audience on YouTube as “stiffs.” Meaning, I felt they couldn’t take a joke, they couldn’t read between the lines because if they did, they would see that I was actually offering some solid advice!
Seriously, in that review, I mentioned that the Vivitar V3800n (which was the featured camera), was a very affordable, all manual film camera that uses the very popular and iconic Pentax K mount which opened the doors to an abundance of great and affordable lenses.
The Vivitar V3800n and 50mm f/1.7 which I got as a combo for $30. Today, this outfit can still easily found for under $100 dollars.
All this started because a friend had asked about getting into film photography and was asking if he should get a Leica, Contax, or Nikon? Which led me to the thought…why does a film beginner need to spend a lot of bucks?!
Now I’m not here to tell anyone how to spend their money but having been down this path before I felt it wouldn’t hurt to try and help someone save some money!
Another factor is the real likelihood of someone like my friend, who has been shooting digital exclusively, will end up giving up on film and be stuck with a bunch of expensive gear that he’d have to try to eventually sell. And guess who he’d come to, to help him sell it? 😂
THE CHEAP CAMERA CHALLENGE
I’ve seen a bunch of “cheap camera challenges” and although entertaining, I never thought of doing a video on it until now.
Part of the reason is that, as someone who has admittedly been spoiled by using Leica, Contax, Nikon, etc, it was very hard for me to contemplate “wasting” a roll of film on a cheap camera. Now I know that sounds elitist but honestly with the rising prices of film these days, I really only want to use this precious commodity on something I’m interested in.
So with that kind of thinking, I realized I had lost my roots. I started photography with a Minolta X-700 and a cheap Vivitar point and shoot in the 1980s. I have documented this fact many times here.
So considering that I had only used the Vivitar V3800n once or twice in all the years that I’ve had it, I figured this would be a good time to use it again and document the results with you guys here and on YouTube!
So I put in a roll in early January and just finished the roll near the end of last month and here are the results.
SAMPLE PICS
All photos in this set were taken with the Vivitar V3800n, 50mm f/1.7 Vivitar lens and shot on Ilford HP5 Plus and developed in Xtol.
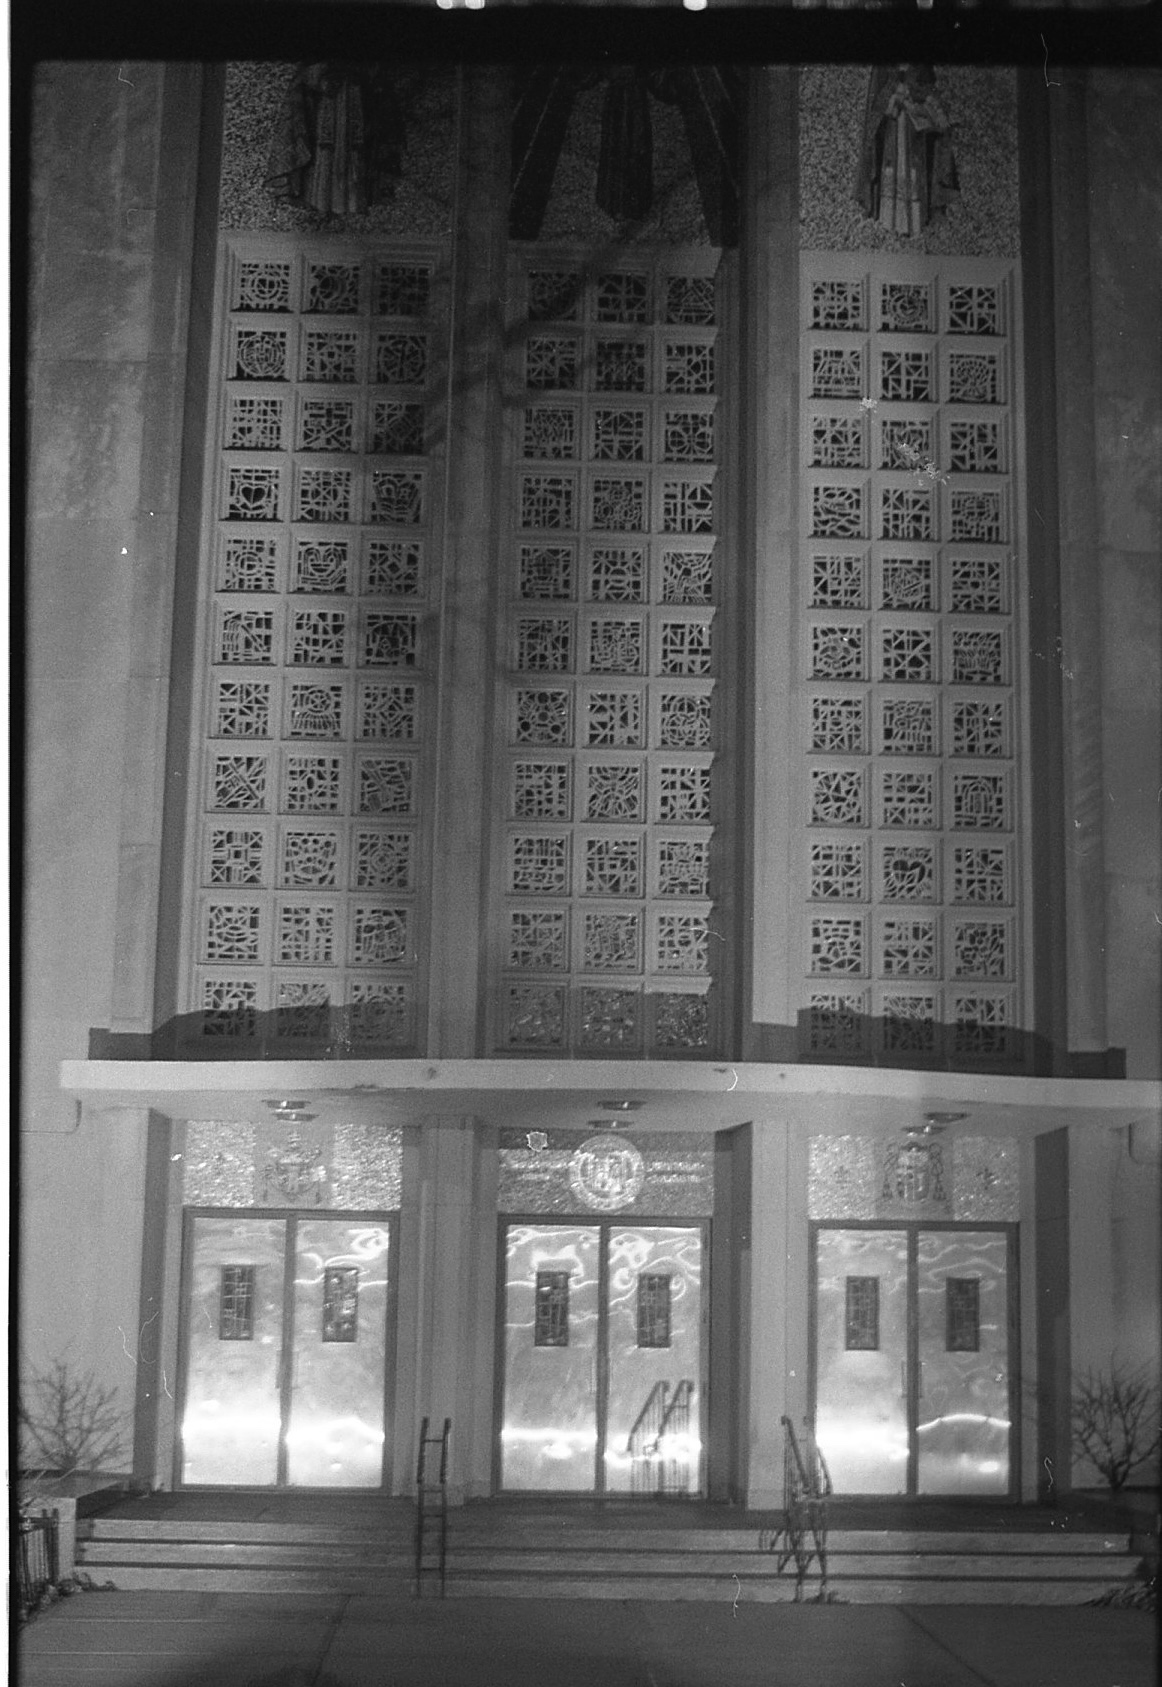
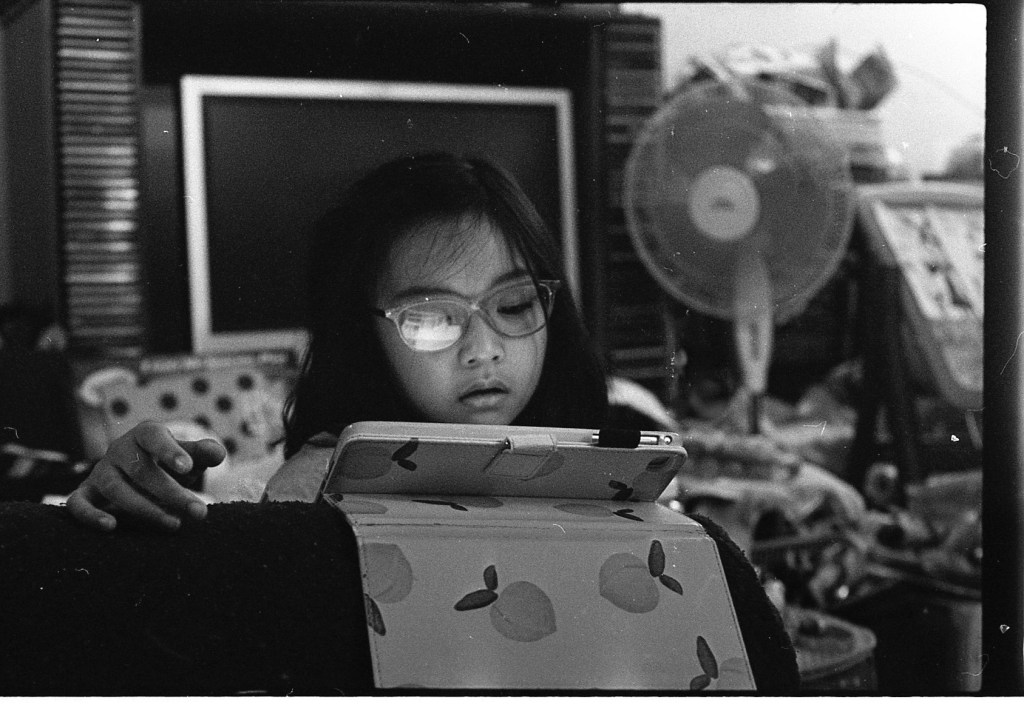
Snow DayIce ColdMochi CakeMochi Cake Closer CropDelicious Tempura ❤️TaxiGraffiti Bronx StreetChurch At NightCloser CropBucket Of CrabsAvailable Light @ Night
PRICE & AVAILABILITY
The Vivitar V3800n is cheap and still easily found on the used market. Prices can range anywhere from $10-40 USD for the body only and same for the Vivitar 50mm f/1.7 MC lens. Sometimes you might even be able to find them for free! 😍
If you can’t find the V3800n, any of the V series bodies will do for basic shooting.
The V3800n was made by Cosina and uses a Pentax K mount so lenses are plentiful and can be very cheap. You don’t need to use a Vivitar branded lens if you do not want to.
CONCLUSION
The Vivitar V3800n and 50mm f/1.7 Vivitar lens were the most fun I’ve had with a film slr in a while!
It’s not perfect, I’m not going to lie. It feels cheap and there are some issues that might be detrimental to beginners. I explain all that in the video.
But once you learn how to use the camera you will see that it’s capable of taking good pictures. And there’s just a “cheap thrill” (pun intended) to getting satisfying results on cheap equipment, like you got more than your money’s worth!
I’ll even go out of my way to say that it’s perfectly capable of taking pictures as good as any equivalent combo. By that I mean, for example, a Pentax K1000 with 50mm f/1.8 or Canon AE-1 with 50mm f/1.8 FD lens or Minolta X-700 with 50mm f/1.7 MD lens. These are just some examples but you could add your own and as long as you’re being fair, I can say the Vivitar will match up to it! No it will not beat a $5000 Leica or Zeiss 😀
In conclusion, my main point of doing this cheap camera challenge is to show, especially beginners, intermediates, or anyone wanting to get into film photography that it doesn’t have to be expensive. You can have a lot of fun with film photography without paying a lot!
Over the past few months, and indeed over the years some of you have reached out to me here, on Facebook, Instagram, and YouTube asking me basically something that sounds like this:
“Sam I really want a Contax T2, or a Konica Hexar, or a Nikon 35ti, or a Ricoh GR1 but the prices on those cameras are insanely high. Can you recommend a low cost alternative that delivers the goods?”
Now if you’re one of those people who asked, or if you echo those same sentiments then I would ask you…why do you want those cameras?
For some, it’s most likely because those premium cameras are among the most wanted on the YouTube playlist. In fact, the YouTube reviews by young millennials might be the driving force to why these cameras have skyrocketed in price. Kendall Jenner was just a catalyst with the T2 but the YouTube reviews thereafter took the prices into the stratosphere!
Now for you guys who are really into photography, you may have wanted one of those premium cameras for street photography. By and large, the premiums like the T2, Hexar, 35ti and of course the Ricoh GR1 have a deservedly good reputation as street cameras.
But the insanity of the high prices on those cameras keeps the thinking man from jumping in. Can you really get comparable quality from cheaper cameras?
Today I have an alternative for you that I believe is an excellent choice, and at perhaps at 1/10th the price of most premiums.
And that camera is the Yashica 35CC. It is a camera I believe to be Yashica’s hidden gem.
INTRODUCTION
The Yashica 35CC/CCN is a compact, 35mm rangefinder with a 35mm f/1.8 Color-Yashinon fixed lens.
The camera has a shutter speed range of 8 seconds to 1/250 and a flash synch of 1/30th of a second. The camera runs on one 6 volt 544 or equivalent battery.
YOUTUBE VIDEO
For those who are interested in this camera, this video review may have the answers to your questions. It’s a pretty deep dive into this camera!
IMPRESSIONS OF THE ELECTRO 35CC AND IN USE
While I’ve used several Yashica Electro models over the years, the 35CC was a late addition to my collection and I got it around 2018-2019.
My first impression is that the camera is much smaller than more well known models like the Yashica Electro GS/GSN.
According to the Camera-Wiki, the Yashica Electro 35CC is “wrongly” thought by some to be part of the Yashica Electro family. However as I show on my YouTube video, you can’t blame people for “wrongly” thinking that when it actually says “Electro 35CC” on the top of the camera! 😀
But the thing that stands out right away and the thing that is indeed the star feature of the Electro 35CC/CCN. It is that bright 35mm f/1.8 lens!
Traditionally, rangefinders from this era have fixed lenses in the 40-45mm range. Think the Olympus SP, the Canonets, or even the aforementioned Yashica Electro GSN.
And even premium compacts like the Contax T2 has a 38mm f/2.8 lens. So the lens on the Electro 35CC at f/1.8 is a stop faster than the 2.8 on the Contax T2, Nikon 35ti, Leica Minilux, and marginally faster than the Konica Hexar’s 35mm f/2.
What does that extra speed buy you? The ability to shoot in lower light conditions and hopefully getting a good shot. And even though the 35mm focal length has never been known as a bokeh monster, the extra fast f/1.8 might help coax out that extra bit of bokeh.
What doesn’t it have that the premium compacts mentioned above does? It doesn’t have autofocus for one thing. It doesn’t have a Carl Zeiss lens or a Ricoh GR lens but without those brand labels, the prices can be kept low. That’s a positive thing!
IN USE
The Yashica Electro 35CC is small and compact and feels good in the hand. It’s a little on the thick side so it’s not exactly pocketable for the usual pant pockets.
The rangefinder patch on my copy is nice and contrasty making it easy to focus. There are dual focus tabs on the lens which is a nice touch.
The controls are sparse. The camera is basically aperture priority. You select the aperture via the markings on the lens and the camera selects the shutter speed. The shutter speed range is a whopping 8 seconds to 1/250th for the top speed.
The camera gives no indication of what speed it chooses. The only indication is a + or – for over or underexposure.
On my particular camera that indicator no longer works. I can’t see anything indicating over or underexposure. The battery check on my camera is also not working. However, that did not stop the camera from producing mostly well exposed images.
If you run out of batteries there is a default mechanical speed. Some sites say it’s 1/250th but others say it’s 1/30th. In my opinion, based on usage, it seems the default shutter speed without a battery is 1/30th.
SAMPLE PICS
All images below were taken with the Yashica Electro 35CC and Kentmere 400 film developed in Xtol.
Please refer to video for more details.
Based on my own tests, I believe the 35mm f/1.8 Color-Yashinon DX lens to be excellent.
In the above images, I can see that the lens is really only held back by the film (Kentmere 400) and/or my developer Xtol.
At f/1.8 there is a touch of softness (as are most lenses wide open) but it’s actually sharper at f/1.8 than I expected so I’m perfectly fine with its performance.
From f/4 to f/11 you can expect excellent sharpness and good contrast, assuming the camera chooses a fast enough shutter speed.
PRICES, AVAILABILITY & WHERE TO BUY
The prices for the Yashica Electro 35CC are trending from $80-130 USD.
I’ve read that this camera is hard to find but I don’t think it’s that hard to find. I got mine from KEH in 2018 or 2019 for around $100.
In fact, while working on this article I saw one last week, again at KEH for $133 in EX condition.
It is true that you don’t see them too often from USA dealers. However they are plentiful on eBay, from sellers in Japan.
As mentioned before, I have bought many times from Japan without issues. However, you must do your research on the seller, as always, no matter what country it comes from.
BOTTOM LINE
The Yashica Electro 35CC is a hidden gem! It may not be as well known or as desirable as say a Contax T2 or Nikon 35ti, but especially for street photography I find the images it produces just as satisfying.
And the fact that you can find these cameras for about $100 USD on average, well, that adds incredible value and enjoyment to using this camera!
The Yashica Electro 35CC/CCN may never go down on its own as a true Camera Legend (but it might!), but there is no doubt that the Yashica Electro series as a whole are Camera Legends that have made memories for people for decades.
In my opinion, the Yashica Electro 35CC is one of the best that you can get from this series, even if Camera-Wiki doesn’t consider it part of the Electro family 😀
If you see one at the prices I mentioned, buy it! And tell ‘em Sam sent you 😎📸👍🏻
Good morning you awesome camera geeks! Over the years, I’ve catered to camera and photography lovers of every kind.
Perhaps because I’m a collector myself, I’ve written a lot for camera collectors. I’ve tried to do both film and digital reviews because I love both but there’s one group I’ve not done a lot for. That group are the humble beginners.
I actually did a video on YouTube a couple of years ago called “The Benefits Of A Cheap Camera” in which I talked about the Vivitar V3800n, a cheap and affordable 35mm slr and although I tried to give some useful advice in the video, I don’t think a lot of people liked or understood my lighthearted approach and humor 😀
So today I will try to be more gentle and serious (if that’s possible!) in my approach
YouTube Video
The bulk of my advice today will be on my YouTube video. The young film beginner today is more likely to watch a video rather than read an article. For the rest of this article I will concentrate more on things I didn’t touch on in the video.
People can be funny sometimes. I’m sure a some people might say “Ah he’s just pushing his video!”
And the funny thing is, if the video is on Camera Legend YouTube and this is the Camera Legend blog, shouldn’t I be doing that?! It would be unwise of me not to 😍
But as you’ll see, this article touches on a lot that’s not on the video so consider it an addendum to the video.
Big Beginner Mistake
As beginners we all make mistakes. Heck even when not a beginner we make mistakes! At least I do still today 😀
To me though one of the biggest mistakes I see the beginner in 35mm film photography make is the notion that they have to be an expert camera operator first.
It’s not the beginners fault really. It’s perhaps all the “super photographers” they read about or see on YouTube but it seems to me they feel the need to learn aperture, shutter speeds, lighting, flash, everything all at once!
And yes it IS important to learn those fundamentals of photography but the truth of the matter is mastering these things take time and lots of practice.
Obsessing about learning camera function so much can make you overlook perhaps the most important aspect of photography: the actual picture. Taking the picture. Learning to focus the lens. Learning to compose. Developing an eye for a good picture.
So you say Sam, if I don’t know how to operate the aperture and shutter speeds then how am I going to take good pictures?!
Fear not! Let me introduce to something I call “The 1985 Method” 😀
The 1985 Method
No this isn’t actually a “method” I came up with but it’s how I developed a love for photography.
Back in the 80s as a youngster starting out, I usually shot sight unseen. Before I really got into photography, the camera was just a way of capturing my family, my friends, my world.
All I did was shoot and shoot. I knew nothing about aperture or shutter speeds. I knew nothing about composition or the rules of photography. I learned by discovery. And that still shapes a lot of how I approach things today.
Circa 1986. A selfie of two wannabe rockstars 😂 Shot with a Minolta X-700 and 50mm f/1.7 MD lens. I knew nothing about aperture and shutter speeds but those early days of photography experimentation are the ones I cherish most.
The knowledge of light, aperture, shutter speeds, composition, that came later as I started buying books and magazines. You could say I started out photography the wrong way! Yet, some of those early photographs are the ones I cherish most.
It was photography in its purest form in my opinion before it became the “game.” A game of “you should do it this way or that way.” You should use this camera, buy this lens, etc, etc. I guess you could liken the experience to the innocence of a child before the realities of the world corrupts them.
As mentioned on these pages before, I dabbled in photography in the early 80s with my parents cameras with mixed results. It wasn’t until 1985 when Mom bought us a Minolta X-700 that I started getting (to me) great results, certainly better than I was getting previously. I’ve always considered the Minolta X-700 that I got in 1985 my first “serious” camera.
The Minolta X-700 was my first “serious” camera and served me well as my only SLR from 1985-1994 by giving me consistently well exposed images.
Even as a teen, I was getting roll after roll of consistently good results. As I got older, many of the photographers I met encouraged me to go back to all manual camera like the Pentax K1000, Nikon FM or Olympus OM-1. They told me I should do more “serious” photography. I did try those cameras and I loved them but I didn’t always get consistently good results like I got with my old Minolta.
This photo from 2009 is probably my last shot taken on my original X-700. The lens used is the 50mm f/1.7 Minolta MD lens and the film was Kodak T-Max 400 developed in T-Max Developer. Twelve years already?! My how time flies.
With time and a lot of practice, I started getting results as good or better than the Minolta. I found out why…
It was because I often used the X-700 in the green P or Program mode. In this mode, the camera figured out the exposures for me and it mostly got it right most of the time! The Minolta was doing most of the hard work for me!
I was getting good pictures consistently and that inspired me to continue doing photography. And I have the Minolta X-700 and its great Program mode to thank for it!
Doing It The“Wrong” Way!
You see it all the time. Many photographers recommending a beginner start out with an all manual camera such as the Pentax K1000 or Olympus OM-1. Heck I’m a big pusher of that “hardcore” method 😂
So it may be a surprise to hear me say that for the beginning 35mm film photographer today I am not recommending they start out with an all manual camera any more. Even though in this YouTube generation things are easier than ever, I now advocate the beginner to start with a little bit of automation.
If you’re a beginner at 35mm film photography, I recommend you get a camera with a Program mode like the Minolta X-700 and I want you to use it! In addition, your first camera should also have an aperture priority or manual mode. I’ll explain more later.
My dusty and war torn Minolta X-700 from 1985 with its legendary Program mode.
I’m not the first person to advocate using the Program mode and I won’t be the last. And although the old “hardcore” method of having the beginner start out with an all manual camera is still near and dear to my heart, I realize it is actually a little bit of a “cruel” thing to do to a beginner 😍
A True Story
As a good example, back in the late 1970s my parents had a good friend who was really into photography. He had the great cameras like the Canon F-1 and A-1.
He was especially fond of his multimode A-1 and always got these great shots. He was always showing us slides and projections of his work.
I think I’ve mentioned before that this family friend was probably more responsible than anyone else for my interest in photography, cameras and lenses!
Anyway seeing all his great work, my parents asked his advice on getting a camera. He helped them choose the Canon AT-1. That’s right folks. Not the AE-1 or AE-1 Program but the no frills, manual mode only AT-1.
Guess what? My parents knowing nothing about aperture and shutter speeds, never bothered to shoot with the camera. It was never used until it was stolen from our apartment in 1982.
To this day, I wonder why our dear family friend, God Bless his soul, I wonder why he would recommend this camera to them and not proactively try to help them use it?
But as I said that was then. Today, young beginners can find everything they need to know online!
And since I’m in a kinder “ask what I can do for you” mood I am not going to be cruel and have them start on an all manual camera the way our friend did to my parents 😍
That may change though! 😂 And yes, it will change once we get into medium and large format cameras where automation is much less available.
The World Has Changed For 35mm Film Beginners
The main reason though why I no longer recommended the all manual camera “hardcore” method is because many different dynamics have changed. But one factor above all is a game changer. I’ll explain…
Back in the late 80s and all throughout the 1990s until perhaps the mid 2000s, I had one distinct advantage that film photography beginners today don’t. And that is something we took for granted called the “One Hour Photo.”
One Hour Photo?
What is a one hour photo? There was a movie starring Robin Williams called “One Hour Photo” but that’s not what I’m talking about 😀
A few of my “one hour photo” packets. The one hour photo developers have all but disappeared in today’s world. I still have a ton of old photos that I haven’t scanned but I know it’s a treasure trove of memories.
I’m talking about the places that develop your film in about an hour. At its climax, they were everywhere in nearly every country. You remember, don’t you? Well old school photographers will remember it well but kids born after the year 2000 may have no clue.
Basically, before digital came around and shattered everything, film photography had developed to its highest point of convenience where in the USA stores like Costco, CVS, Walgreens, and even local camera shops and pharmacies offered to develop your color print films in about an hour or so. Many times it took longer than the advertised “hour” but you’d still get your prints back rather quickly.
Companies like Fujifilm and Konica often supplied the machines necessary to do this.
So if I were trying out a manual camera, I could theoretically finish the roll and get the results back the same day and I did so, often!
But as digital began to put a stranglehold on film in the mid 2000s, these one hour photo labs began to fold. Many were gone years earlier when they saw the writing on the wall.
Today, you would have to send your film to a dedicated lab. The usual time for you to get your results back is around two to three weeks for most labs. Costco stopped developing or sending out film for most of their stores but CVS and Walgreens will still send your film out for development. Sadly, a few years ago they began this bizarre policy of not returning your negatives so if you have them send out your film, the negatives are gone forever.
The disappearance of the one hour photo labs is perhaps the main reason I relearned to do my own black and white development. I couldn’t stand the wait!
For the budding beginner in 35mm film photography, it is unlikely that they would be developing their own photos and so they must wait.
Why Great Results Fast?
We live in a world where we want and usually get everything fast. I can’t just blame today’s kids for being impatient because I myself have been spoiled by the convenience of it all.
Before the internet, and even as recently as the late 1990s when there was some internet, you’d sometimes have to wait weeks for an order to arrive. Today, I get most of my online orders in two days! That’s a game changer and no one wants to go back.
But in the world of film photography, sadly 35mm film development (as far as the wait goes) has gone back to something worse than it was when it was at its best in the late 90s and early 2000s.
It is my feeling that waiting two to three weeks just to get back lousy results from that first roll of film will do nothing but curb the enthusiasm of all but the most determined beginner photographers.
So I recommend the beginner start out with the much maligned Program mode, get some good maybe even great results right away and get excited about 35mm film photography.
Yes you should know the Program mode is not foolproof. Most old cameras have center weighted metering that can be easily fooled by bright light sources. However I’m willing to bet that the Program mode is going to yield a better percentage of results than if one were going in blind or trying to remember what they read or saw in a tutorial.
Shoot in Program mode. At the same time watch some good YouTube tutorials, read a book and take notes. After a few rolls in Program mode, then start experimenting by gently going out of the Program mode.
Recommendations
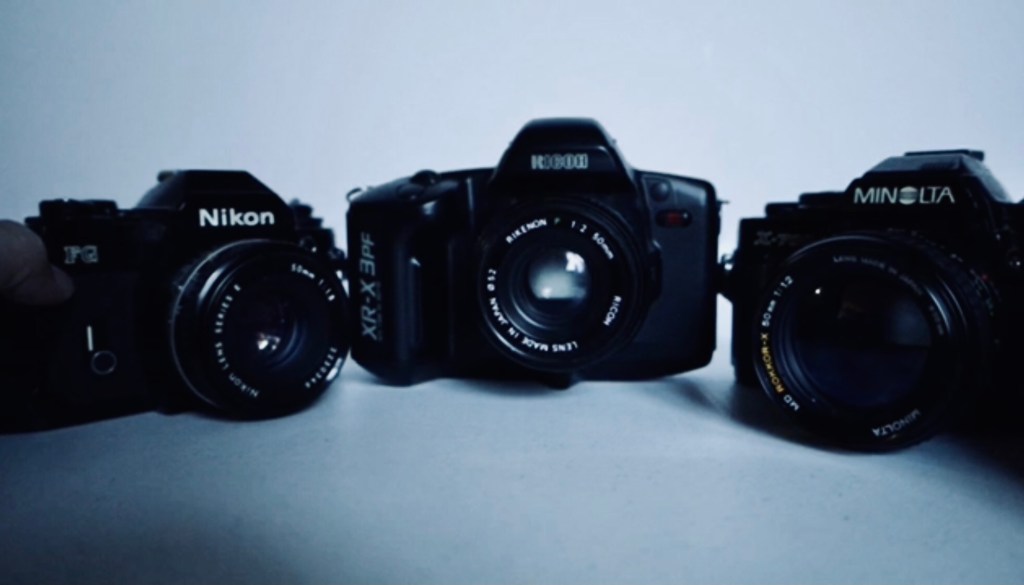
In my video I recommend and do a mini review on three cameras; the Nikon FG, the Ricoh XRX 3PF, and the Minolta X-700.
All three I have used and they all have a Program mode as well as manual mode.
I went into a lot of detail in the video so for the sake of time, I’ll just leave the details there for those interested. I also make recommendations on what to get for your first lens and also recommendations for film.
The photos below are extra samples from the humble 50mm lenses that I recommend a beginner start with.
By “humble” I’m talking about the 50mm f/1.8 or f/2 from any manufacturer and 50mm f/1.7 from some manufacturers.
The first shot was scanned with an Epson flatbed in 2010. The other two were crude iPhone X scans so they may not show the true nature of the images.
My Epson flatbed has gone caput and I’m trying to decide whether to go with a mid level scanner or a high end one. In addition to devoting time to YouTube, this one of the reasons you haven’t seen my work here. I’d really hate to continue giving you guys low quality scans! Y’all deserve the best 😍
This shot from 2010 was taken with a Nikon F3HP and 50mm f/1.8 Series E Nikkor. I am a big advocate for the good old and cheap nifty fifty. Scanned with Epson flatbed scanner in 2010. “Dark Horse” 😀 Circa 2010. Nikon FG, 50mm f/1.8 Series E Nikkor. Film unrecorded. Scanned using iPhone X. This image was shot with the Ricoh XRX 3PF and 50mm f/2 Rikenon stopped down to roughly f/4-5.6 With the humble 50mm you could shoot wide open to blur the background or stop down mid aperture for more subtle bokeh such as this. Scanned with an iPhone X.
As mentioned this article is an addendum to the YouTube video. Most of what’s on the video is not here and most of what’s here is not on the video. I’m not pushing you to the video for the sake of views. If that were the case I’d be making videos like crazy but I’m not. Note how long this article already is! 😀👍🏻
I figure those interested will check it out and those who don’t won’t.
Another point I didn’t touch on enough in the video is that it doesn’t have to be Nikon, Ricoh, or Minolta. You could get a Pentax Super Program if you like Pentax or Canon AE-1 Program if you like Canon. Any camera with a Program mode and a manual mode will do!
The main point is to get a camera with a good Program mode to start getting good results right away.
No Autofocus!
I however am NOT recommending that the beginner gets an autofocus film slr for their first film camera at this time. If you start with an autofocus camera and autofocus lenses then in my opinion you’re probably better off shooting with a DSLR.
I want you to have the Program mode for automatic exposures because exposures are probably the trickiest part for a beginner to understand, but I’d still want you to learn the “art” or the craft by learning to focus and compose. Get great results, get excited, and the rest will come to you with time, practice, and experience!
Conclusion
I can’t believe it took me all that space and time to basically say: Start out in the Program mode, get good to great results, get pumped about photography and work your way through the rest! You’ll be more interested in learning the camera when you start getting good results! 😀
Anyway this was the most I could put in one article but in future articles and videos we’ll work our way out of the Program mode so that you can work the camera and feel like a “real” photographer even though the Program mode will deliver 80-90 percent of the time! 😎
What is your opinion? Do you agree? Disagree? How did you learn 35mm photography? Leave a comment I’d love to hear it! In the end though, it’s just one man’s view so take it with a grain of salt and have a great day folks! 😍📸👍🏻
Good morning awesome war-torn camera geeks! Last night I was going through a bunch of photos I haven’t seen in a long long time. They were all stored in boxes I haven’t opened in years.
Today I want to share some of them with you. These pictures are basically just snaps from a New Year’s Eve party all the way back in 1986!
Our parents had a rich doctor friend who often threw New Year parties in his New Jersey mansion. He had an elevator in his house! He had a Mercedes, a Range Rover and even a DeLorean.
We were poor kids who lived in NYC and we always appreciated a chance to get out of the apartment. No jealousy, we loved the doctor and loved seeing all his toys 😀😎
If this was in today’s world I probably wouldn’t share these photos especially if shot on a phone camera but due to the passage of time and the technical information on the photos, I thought some of you may find it of interest.
Minolta X-700, 50mm f/1.7 MD lens, Kodacolor VR 1000 film. No flash. Shot on December 31, 1986. Here’s Dad in the corner of the basement at a New Year’s Eve party taking a smoke break. Note the grain structure and soft colors.
So to set up the story for you, I was a geeky teenager in 1986 and looking back now I was lucky to be shooting a Minolta X-700 that Mom got for me & my brother. The X-700 has become one of the most desirable Minolta cameras on the used camera circuit.
The Minolta X-700 was my main camera from 1985-1994.“Party Animals” 1986. A flash was used for this shot.
The lens I used in these pictures was the 50mm f/1.7 Minolta MD lens which was a lens I would use for the next ten years. Simply because Mom didn’t want to waste money on more camera gear because cash was tight. But it’s ok. I learned a lot using one lens 99 percent of the time. And it’s probably why even to this day I still prefer using prime lenses.
Anyway the film is the star of the show here. It’s a Kodak film and it’s ISO 1000! Now back in those days “High ISO” was nothing like we know it today and high iso film were few and far in between. Surprisingly or not high iso film is few and far even today!
The film used in these pics was Kodacolor VR 1000 color film. Based on my research it was the only Kodak ISO 1000 color film that would have been available in 1986.
“New Year’s Day” 1986. Shot on January 1, 1987. The morning after the party. “Nothing changes on New Year’s Day” as the U2 song says. I love the grainy look of this shot!
The general consensus back then was that these high iso films would be grainy, not very sharp, and intended to be used for low light or dimly lit shots. Back then the compromises were not objectionable to me because the high iso film gave me the chance to take photos without the Minolta flash I used for all my indoor party photos.
Kodacolor VR 1000 apparently used the same T-Grain technology used in some of Kodak’s Disc Camera films. No wonder the big grain looked familiar to me!
If some of you may remember I reviewed the Kodak Disc Camera here. You may find it by using the search bar.
So what do you think? I personally love the grain and grit! I wish I had more photos to show you. I might but I have to look around. Seeing these photos actually made me wish a similar film was around today but alas there isn’t.
In today’s world you could take pictures way better than these with your cell phone but then again what fun is that?! 😀
As I always tell people, try not to throw away or delete your photos, no matter how trivial. You may look back on them one day and find memories that are priceless.
SEASONS GREETINGS
The “Wacky Bunch” wishes you the best for a safe and Happy Holiday season! Stay in touch with us on social media:
Good morning camera geeks! Today’s YouTube video is perhaps my shortest! And surprisingly no words from a guy who seems to be able to gab endlessly 😀
This is not part three of “The Lonely Art Of Film Developing.” That is part of a longer series on black and white photography. I was almost done with that video but allergies and lack of time has set me back.
But I didn’t want my subscribers to wait as long as I used to make them wait for a new posting and I had this video already made months ago. I never posted it for some reason or another. I guess I was waiting to do a full M6 review but I knew that would take forever so I posted it tonight as a way of saying thank you to the camera geek faithfuls so they have something new to watch. I have a bunch of videos I made and never posted. This is just one of them.
The Leica M6 is perhaps the most popular Leica camera in the world. They sell every one of them! Have you ever noticed an M6 go for sale on your favorite camera dealer’s website and within a day, sometimes hours, it’s guaranteed to be gone.
This is a testament to the M6. It’s a great and reliable camera. It’s an icon. It’s a Camera Legend!
However, its popularity is more complicated than just the fact that it’s a good camera. It’s a mesh of several factors, ie, the resurgence of film, it’s a Leica, it was at one time “affordable,” it’s been reviewed ad nauseam, it’s been touted as the greatest thing since sliced bread and oh yes, the hipsters love it!
All these things and more have worked in the favor of the M6 driving up the prices and continuing to cement its legend.
In many ways, the rise of the Leica M6 reminds me a lot of the Canon AE-1. Two totally different cameras I know, but both have benefited from similar circumstances. And yes, hipsters love the AE-1 as well!
Like many cameras before, I’m just so glad to have bought it at an earlier time when the prices were sub $2000.
Anyway today is not a Leica M6 review. Today’s video will show how easy it is to load the M6 and it is EASY!! It is in no way intimidating like older Leicas.
Extra Tip: Once you have the film secured in the camera, just start taking shots, no need to wind to “0” to get that first shot. If you do it this way, you may be able to get a couple extra frames from the M6!
If you are thinking of getting an M6 or just got one I hope this helps! Thanks for reading and watching and have a great week my friends!
Good September morning camera lovin’ geeks! Here’s a photo recently developed using the methods shown in my previous two YouTube videos.
The camera used was a Rolleiflex 3.5F 75mm f/3.5 Planar lens, film was Ilford HP5 Plus, developer was Ilford ID-11.
I’m pulling together the rest of the roll as well as some from a roll I developed tonight for the next video.
As seen in the YouTube videos, I’m not always textbook when I comes to developing. Perhaps I’ve gotten sloppy and I’m certainly not advocating you get sloppy.
Many years ago when I started developing film again, I was always by the book. The exact amount of developer, fixer, the exact number of minutes.
But over the years, and not on purpose either, I began to get off the books. I would sometime miss a minute of agitation here and there. Sometimes I would forget and leave the stop bath for an extra two minutes. Sometimes I had little fixer left but used it anyway with an extra dilution of water and extra minutes.
To my surprise, my results were almost always the same as when I did it by the book.
So when I say black and white film development is not an exact science it’s from my experiences. It’s not an excuse to be sloppy and for the absolute beginner I do advise going by the book. That said, black and white film developing at home is very forgiving of variations in time and temperature.
Of course if you do more esoteric b&w developing like stand development or cafeinol you might want to follow the recipe more closely.
Now C41 color film development I do find to be much more of an exact science when it comes to time and temperature. This is what I want to explore in the coming months.
As for the above photo, I do love any chance to have the girls stand still for a photograph and while I’m happy to have this portrait I was testing for something very specific with regard to the Rolleiflex 3.5F. I will share this with you in upcoming posts. Why not today? It’s not because I’m trying to build anticipation lol but simply because this would take up a whole article in itself! 😀
Thanks for your time and happy Tuesday good peeps!
Chances are you’ve never seen this camera in person. Neither had I until recently. The Minolta X-700 in chrome finish.
THE MINOLTA X-700
Although this is not meant to be a formal review, I feel I should give you at least a little information on the Minolta X-700.
The X-700 is a manual focus SLR introduced by Minolta in 1981. In its time, it was praised for its AE modes, flash automation and ease of use. As a classic camera it is very basic by today’s standards.
The camera offers Aperture Priority and (a much praised at the time) Program mode. You can use it in manual mode as well. Shutter speeds from 4 secs to 1/1000. It runs on two S76 batteries and can accept a motor drive and other accessories.
I actually did a lengthy review on the X-700 many years back on another site and I’ll try to transfer that over here.
I have to admit I have a soft spot for the X-700 as it was my first “real” camera as a kid back in 1985.
THE X-700 CHROME
Cameras have traditionally come in either black, silver, chrome or all of the above. Of course, there are special editions like reptile, ostrich, etc, etc, but we’re not talking about those.
Some cameras were always seen in silver or chrome trim such as the Pentax K-1000. I’m not sure I ever saw a black one. Indeed, I don’t think there ever was a black one made by Pentax.
The X-700 on the other hand is almost always seen in black. I had never seen a silver or chrome (whichever you prefer to call it) version in the flesh. In fact, for many years I never even knew it existed because of the fact that I have only seen the black ones.
But here it is in the flesh! It is real and it is beautiful! Well, to me anyway.
COLLECTIBILITY
Now if you have one of these beauties, take pride that you have a pretty rare thing. However rare does not translate to valuable.
I got this one for $65 and again, I found it when I was not even looking for it. I see a couple now on eBay, and with prices around the $400 mark with lens and other items to entice you.
No disrespect intended, but I highly doubt anyone would pay that much for one unless they really, really, and I mean REALLY wanted a chrome X-700 🙂
When I got mine last year, I checked eBay auctions and found one that sold for $149 I think. That being the case, I would put the fair value on these cameras from $65-150 or $200 tops for the camera body alone.
Keep in mind that the “regular” black versions can be had anywhere from FREE to $100 and regularly averaging on eBay for around $30-60 body only and $60-90 with lens.
BOTTOM LINE
The Minolta X-700 was Minolta’s most advanced model in 1981. I would say that it could very well have been the most successful Minolta SLR ever, although SRT fans will disagree with me. It was the camera that put Minolta on the map for the 80s and within striking distance of taking the top spot from the likes of Canon and Nikon.
Of course we know that did not turn out to be the case. But man, they were close with this camera. The camera, coupled with the “Only From The Mind Of Minolta” campaign were an indelible part of 1980s camera lore for me. Never before or since have I seen a film SLR get that much press and television advertising. It was classic.
The Minolta X-700 may be a very basic camera by today’s standards, but there is no doubt the camera is a Minolta Camera Legend. And if you come across a chrome one, all the better! Take pride and keep it.