How To Scan Film Using Your Phone & Tablet Plus Low Budget Phone Scanning vs Low Budget Flatbed Scan

Just like many of you, I scan my film as a labor of love. It started as something I enjoyed to something that became more like work. Just natural when you have time constraints due to family and job. It can be time consuming but when the results are good, they’re definitely worth it. And sometimes when I get a really good scan I’m reminded of just good film can still be in terms of resolution and detail.

However those of us familiar with using a flatbed scanner for scanning negatives know that sometimes it really can take a lot of time going through even one roll of film if you want or need to make the necessary corrections to get the best out of the images.

Over the years, I’ve experimented with “alternative” scanning methods, primarily as a way of saving time. I’ve tried all the things people try, from DSLR to Mirrorless to Phone camera.

ContaxBuddha

“Big Buddha” 2005. Contax G1, 28mm f/2.8 Zeiss Biogon. The image was “scanned” with an Olympus E-1 and 90mm f/2 Zuiko Macro lens via adapter.

Above is an early attempt at “alternative” scanning. The original photo was taken with a Contax G1, and 28mm f/2.8 Biogon taken on Fuji Velvia film in 2005. I “scanned” this image in 2005 using an Olympus E-1 5mp camera with 90mm f/2 Zuiko Macro lens via adapter. The vibrancy and detail were amazing but setting up the tripod and getting the light right was somewhat cumbersome so I didn’t use this method much.

It’s funny that back in 2005, DSLR “scanning” didn’t really catch on but it’s very popular today, especially with today’s high resolution cameras. But in my opinion, 5mp was perfectly acceptable and I made a nice 8×10 print from the above photo!

CLZoeP

“Time Out” 2009. Leica CL, 40mm f/2 Leitz Summicron. Also “scanned” using the Olympus E-1 5mp and 90mm f/2 Zuiko Macro Lens.

Recently I tried a low budget scanning method using my iPad as a light box and using my iPhone to “scan” the images. You can find a few tutorials on YouTube on how to do this. It seems everyone does it a little differently.

Here’s what I did:

1) Use white background on iPad as a lightbox.

2) Use one roll of tape as a spacer so the film is not too close to the iPad. Too close and the brightness of the iPad or tablet may wash out details or show its pixels.

3) Put film on top of the first tape roll. I use the negative holder from my Epson scanner to keep the film flat. If you don’t have a holder you should find another way of keeping the film flat. Thin glass might help.

4) Put other roll of tape on top of the film and position the image you want to scan. This might require some moving around as most of the cameras on our phones are not placed in the center of the phone itself. The tape roll also acts as support to keep the phone steady.

5) Tap the image on your phone to focus and take a few shots to ensure that at least one is sharp

5) Import into editing program on your phone.

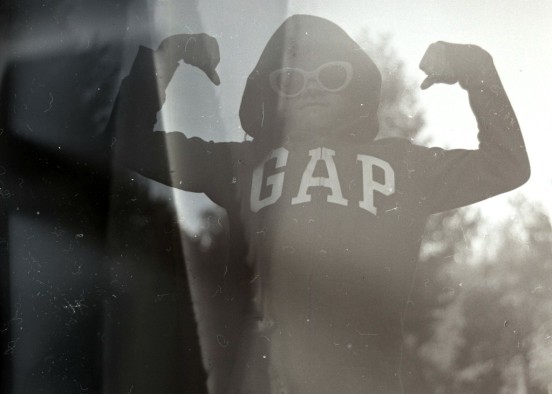
Below is a step by step photo show and comparison. The original image was taken with a Mamiya AF-D and 80mm f/2.8 Mamiya AF lens on Tri-X 400 in 2016! Yet another camera I’ve used but never profiled. It was a great camera system if you need to know!

My flatbed scanner is a now very old Epson V500. I reckon it must be at least eight or nine years old!

My low budget iPad/iPhone scanner! See details in the article on how to do it.

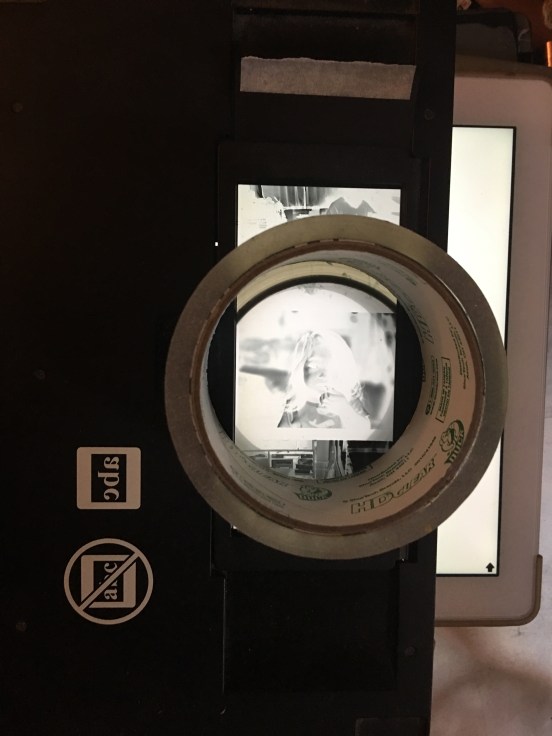
A closer view of a possible Medium Format scan.

An image scanned using the iPad/iPhone method then opened in the Adobe Photoshop Express app.

The final image using the iPad/iPhone scanner. The negative needs to be inverted to reveal the positive image. I then processed the image using the sliders and controls in PS Express.

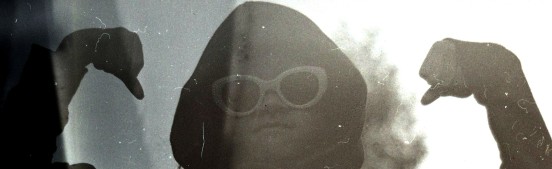
A close up of the above image. This might be fine for a lot of people, and certainly for a quick preview. But as you’ll see below, it’s no comparison to a flatbed scanner.

Same image scanned using an Epson V500 Flatbed Scanner.

Close up of the Epson V500 scan. Note the details in the fabric of the ski hat, the eyes, the teeth. There’s really no comparison!

WHY DO THIS?

Why use your phone to scan you might ask? I can think of a few reasons but probably most important is that it’s incredibly faster. If you just want to get an idea if the image is worth scanning on your flatbed scanner this will do it. It takes literally seconds to scan using the phone camera vs minutes using the flatbed. If you’re pressed for time this adds up!

Also using this method and a photo editing app such as Adobe’s Photoshop Express or Lightroom, you can do it all on your phone and not need to turn on your computer.

CONCLUSIONS?

Well, based on my initial testing the iPhone scans are surprisingly usable as a quick preview. Heck some might even be able to use these scans for posting to social media etc.

However, as expected, the scans from a “real” scanner such as my old Epson V500 are still infinity better. I’ve included crops from both the phone scan and the Epson for you to see.

Check for details in the fabric of the ski hat, and in the face and teeth. There’s no comparison really! But if you want to see images in a pinch, this works!

Now some of you might say, oh well, an optical scanner is even better than the flatbed and yes, I agree cause I had that covered too! Had an optical scanner in 2003 or 2004 and the scans were superior to the flatbed. To this day, I regrettably sold it but the flatbed is a good compromise. For the record, I’ve never used a drum scan so I leave it up to YOU to tell me about it! 🙂

Next step is for me to do a comparison with the Epson flatbed scanner vs using a modern high resolution DSLR or Mirrorless with a macro lens. This should be closer!

Till next time happy Sunday good peeps!

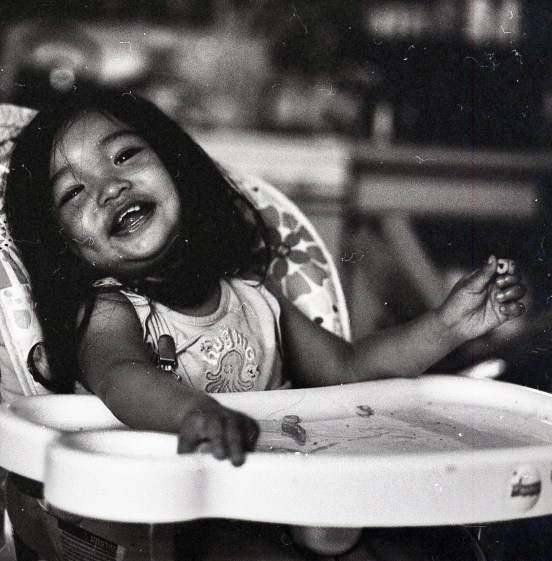
“Happy Sunday!” 2016. Mamiya AF-D, 80mm f/2.8 AF, Tri-X in D76. Zayda doesn’t want to be left out! She wishes everyone a happy Sunday morning good peeps! 🙂

Advertisement

Photo Of The Day: “Saturday In The Park” Mamiya 6 75mm 3.5 G Lens

imgmamiya6kids094ps_66

“Saturday In The Park” 2016. Mamiya 6, 75mm f/3.5 Mamiya G lens, Kodak T-Max 400 in D76 developer.

In my effort to be more active for you good people, here’s a shot and short article for today. Shot with a Mamiya 6 and 75mm f/3.5 Sekor. I actually shot this a couple of years ago before I sold the camera. It was in Central Park.

Speaking of “Saturday In The Park” I recently saw a CNN documentary which I think is a couple of years old, on one of America’s oldest and greatest pop/rock bands, Chicago. I loved their stuff from the 70s and 80s although admittedly they went into the “soft rock” category with the rise of (then) lead singer Peter Cetera, not that it’s a bad thing mind you.

I always thought the band broke up because of Cetera and his ever growing star in the 80s. But now I’m not so sure it was really a case of someone getting a big head or whether he and the band could just no longer get along.

Just like another great 80s band Journey, I’ll always associate Cetera’s voice with Chicago just as I associate Steve Perry with Journey.

Anyway, I’m drifting off course! Music just happens to be my other passion. I especially like rock and popular music from the 50s through the 90s. Not much for music after that 😀

The Mamiya 6 is a Camera Legend. I had a complete outfit in 2009 including the body, 75mm f/3.5, 50mm f/4, and 150mm f/4.5 telephoto. I started selling off the lenses first, then the camera and 75mm because I wasn’t using it enough and needed funds for other things. You know the deal 😊

I’ve always thought of giving the Mamiya 6 a formal write-up on these pages and I’m sure I’ll get to it one of these days, but I’m not sure I could write enough to do it justice. It’s a fantastic medium format rangefinder. In fact, if I had the funds I could easily talk myself into it again!

If you look at the photo, you’ll notice some blotches, most notably on the bottom right, a result of my imperfect developing. Not making any excuses, but many people actually do not mind, and some even “want” these imperfectons these days! Don’t believe me? You should see what people are liking on Instagram! I guess it’s part of what people today consider a part of that “film look.”

Back in the day, I don’t remember people loving imperfect pictures all that much, but since this shot is imperfect…ok, I’m cool with it! 🙂

I’ve always said and it’s worth repeating that T-Max 400 is a beautiful film that develops best in T-Max Developer. As I did not have any T-Max Developer on hand, I decided to take my chances with D76.

I’ve noticed that when in D76, the T-Max will have a tendency to produce streaks and blotches. Sometimes I get lucky and get a clean set, but T-Max 400 seems more finicky than other films and results with T-Max Developer are consistently smooth.

Well, that’s it for this morning. Oh one more thing, these are not all my kids! 😀

Recent (And Not So Recent) Images

Once in a while I like to upload photos, if only to remind myself that I love the art of photography as much as the gear. Though it might not seem like it, I do really love photography as much as I do the gear! 😀

Just like most of you, I don’t just take photos for reviews or posting. I take photos FOR LIFE! I document life first, then if I can use some of the photos in a review, why not?

The vast majority of the photos I take on a daily basis just doesn’t make it in. Oh friend! Why bore you with my life? 😊 I want to know about YOUR life, Brothers and Sisters 😘

So these are some shots taken recently, and some not so recently. Nothing artistic. Just random shots. Sometimes, it’s a snap, sometimes it’s a test. Sometimes it’s deliberate. Sometimes it’s by luck or chance. Like I said, ya never know. I’m sure this is the way it is for most of us photographers, us mere mortals 😊

One thing that I’m sure is that most of these images have not been posted on these pages. I try to include technical info and tidbits for you camera nerds out there cause that’s how I would like it too 😊

I also find it interesting to see what camera and lenses I was using then as opposed to what I am using now. It’s a way of seeing how one’s tastes may or may not have changed. Sometimes I find there’s not a lot of changes!

I think theses images may give you a glimpse as to what I am pondering on doing articles and reviews on. At the same time, you may see why I’m flustered deciding what to publish 😫

Not to sweat it though. Most of you regular readers know by now that this is how I roll. Sometimes it comes in waves. Then I need a mental break haha! I can’t do it daily man, I just can’t.

Definitely got some more interesting stuff to profile for you all, and also on YouTube too. Oh yes, don’t think your “Brother from another lover” has forgotten about YouTube!

I really don’t mind starting out slow there because I don’t want to upload videos just for the heck of it. Just like here on the blog, I realize what you post may be on for a long time so let’s make it count!

Anyway I thank you all for having a look! Appreciate your patience and support over the years. I think you guys are the best readers anywhere. And those of you who also blog are some of the most prolific bloggers around! I certainly can’t do what you do, but thanks for the inspiration! Have yourselves a great weekend!

“Night Buddy” 2018. Nikon D700, 50mm f/1.2 AIS Nikkor. My late night buddy! Try writing an article with this one hanging around. At least tonight, she’s quiet…somewhat 🙂

“Noon” 2017. Nikon D700, 50mm f/1.2 AIS Nikkor. Be forewarned friend. For when the clock strikes “Noon” your heart may be broken 🙂 Actually yes, her name really is Noon! Thanks for being a good and patient model, appreciate you!

“American Girl” 2018. Sony A7r (original) with Mamiya 55mm f/1.4 lens. This is a crop from a larger image. I was just testing this lens when I saw Baby sitting there, lazy and then the spirit of the late great Tom Petty hit me and I heard him sing…”She is…an American girl” 🙂 This is a great lens by the way!

136631492.fIHGz75M.imgBroniZoe180Fa

“Vogue” 2011. Bronica RF645, 65mm f/4 Zenzanon lens on T-Max 400. Every time I look back on a shot from my time with the Bronica RF, I miss it!

“Text” 2017. Agfa Ambiflex, 55mm f/2 Solagon. Kentmere 400 film. Talk about great lenses, wait till I tell you about this one! 🙂

“Sunglass” 2015. Leica M4-P, 50mm f/2 Summicron-M, Tri-X 400. This was actually a night shot near Times Square. Considering that, the sharpness and clarity is pretty good I think. Can never go wrong with a Summicron lens!  You can see the smoke or vape coming out of the man’s nostrils 🙂

“Purple Rain” 2012. Ricoh GRD 8.1mp. “An ocean of violets in bloom” as the Purple One once said! The original GRD remains one of my favorites 🙂

“Smoke ‘n Java” 2007. Ricoh GRD 8.1mp. The brutal art of coffee and smoke. Over ten years later and the GRD is still on rotation in my camera bag these days!

“Baloon Man” 2006. Nikon D70s, 50mm f/1.8 AF-D Nikkor. Cebu, Philippines. In my opinion, the Nikon D70s was one of the best cameras of its era, capable of crisp detail and rich colors. I plan to write an article on this Nikon gem.

“Baby It’s You” 2017. Sony A7r with Canon 35mm f/2 SSC. New York City. Though the focus may be slightly soft in this image, the vintage Canon 35mm f/2 SSC is a great lens capable of sharp images. And if you’re reading Camera Legend, then you know this isn’t just ANY Canon 35mm f/2 lens! Of course, it’s the one with the concave front element and radioactive thorium 🙂

“Chase” 2017. Sony A7r with Canon 35mm f/2 SSC lens. The original image was dark due to underexposure. Lift the darkness in post processing and the A7r shows its legendary dynamic range. Four years later, the original 36mp A7r still delivers the goods!

“Feed Me” 2011. Contax T3, T-Max 400 film in HC110 developer. The T3 is an amazing camera! I’m sure you wouldn’t mind another review, now would you? 🙂

“Times Square” 2017. Sony A7r with Canon 35mm f/2 SSC lens. The Baby don’t care if it’s Times Square or home. She naps when nature calls 🙂

“Buenas Noches” 2017. Nikon D700, 50mm f/1.2 AIS. Yes that means…Good night! 🙂

***NIKON REBATES MAY 2018***

If you’re a Nikon shooter, this is the best time of the year for HUGE savings!! Please buy from our trusted affiliates and support Camera Legend at the same time. It will cost you nothing extra and help us fund more reviews of the Camera Legends you want to see. Thank you!

Nikon Rebates start on 05/06. Expires 06/02

Includes Free! Nikon MB-D16 Battery Grip | Filter Packs | Memory Card | Bag and More

Nikon D750 DSLR Body Only Camera Includes Nikon MB-D16 Grip | $1,496.95

Nikon D750 DSLR Camera w/24-120 Lens | $1996.95

Includes Free! Nikon MB-D17 Battery Grip | Filter Packs | Memory Card | Bag and More

Nikon D500 DSLR Body | $1896.95

Nikon D500 DSLR with 16-80mm ED VR Lens | $2496.95

Includes Free! Nikon MB-D12 Multi Battery Pack/Grip | Filter Packs | Memory Card | Bag and More

Nikon D810 DSLR Body | $2796.95

Nikon D810 DSLR with 24-120mm VR Lens | $3296.95

Save $100 Nikon D3400 DSLR with 18-55mm DX VR Lens | $396.95

Black  – Red

Save $350 Nikon D3400 DSLR with 18-55mm and 70-300mm Lenses $496.95

Black  – Red

Save $350 Nikon D3400 DSLR with 35/1.8, 18-55mm DX VR and 70-300mm ED Le nses, Red | $696.95

Sony A7IIK with 28-70mm only $1298!

Photo Of The Day: “Strong Coffee”

MamZoeI

“Strong Coffee” 2015. Mamiya C330, Mamiya-Sekor 65mm f/3.5, Tri-X 400 developed in Caffenol straight scan, no enhancements. Messy, dusty, but it worked! 🙂

If you’re in the blizzard zone and stuck home this weekend, I hope this will give you extra reading material 🙂

I’ve been developing film for quite a few years and although I don’t consider myself an expert at all, I’m familiar with traditional developers such as Rodinal, D76, T-Max, HC-110, etc, etc.

One developer that I’ve heard about, but never tried till recently was a home brew called “Caffenol.”

This is a process where you use instant coffee, washing soda, and vitamin C powder to concoct a mix that actually develops film.

When I first heard about this years back, I laughed it off thinking it was a big joke. When I investigated further, I was totally shocked that you can develop film with instant coffee!

The photo above is a result of my first Caffenol experiment. Now I know it’s far from an award winning result, probably not the kind of result anyone wants, but to be honest with you, I’m just thrilled that it worked! 🙂

MamZoeII

A 100 percent crop of the above image. I am unsure why, but I am not getting the option to show the image full size as I used to have. I am trying to get to the bottom of this and will fix it, if possible. If you could see it, you would see the glitter around the glasses well resolved.

Above is a 100 percent crop of the original scan. I adjusted the contrast levels to better show the details. I was quite amazed that the result, while messy, actually holds a lot of details!

The image was shot in 2015 with a Mamiya C330 and a banged up Mamiya 65mm f/3.5 lens that I got for $23. The film was Kodak Tri-X 400 which is my go-to for an easy to develop, classic film.

If you search the web, you will find many fine examples from Caffenol connoisseurs who have posted results much better than this.

As I said, I’m no expert at this. The hardest part is finding “washing soda” so I made it myself by heating up baking soda, not certain whether I did everything right. Also in the darkroom, I made the mistake of turning on the lights when I didn’t have cover on the tank with film in it, allowing for possible light contamination. Something I’d never done in all the years that I’ve developed film. Because of these issues, I was even more amazed that it actually gave me something at all!

I am now eager to experiment more and to perfect this process. However, that would mean I would have to waste a lot of rolls of precious memories so I have to be sure that each roll I process with Caffenol is really “disposable” to me, so to speak.

If you haven’t tried this process, take a roll of film that you think you could part with and try it out. It’s a lot of fun and could potentially save you money from buying traditional developers. It’s quite a kick to take the instant coffee on your kitchen shelf and turn it into a film developer, it really is! 🙂

Have a blessed day and I hope you stay safe in you’re in the zone of this major blizzard.

Best, Sam

Note: I’m not sure if I’m doing something wrong or something changed with WordPress, but people used to be able to click on the photos to see a larger version, but now it doesn’t give me that option. If anyone can tell me why, I would appreciate it!